Free AZ-700 Exam Braindumps
Designing and Implementing Microsoft Azure Networking Solutions Questions 101–105 (page: 22)

Updated On: 10-Feb-2026
View Related Case Study

HOTSPOT (Drag and Drop is not supported)

You have an Azure subscription that contains the resource groups shown in the following table.


You have the virtual networks shown in the following table.
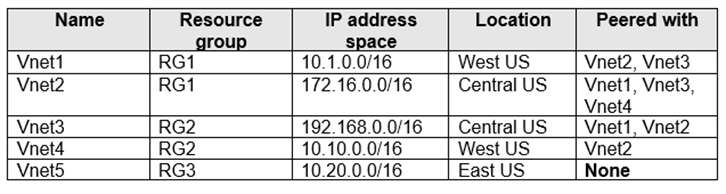


You have the subnets shown in the following table.


For each of the following statements, select Yes if the statement is true. Otherwise, select No.

Note: Each correct selection is worth one point.

Hot Area:

  1. See Explanation section for answer.

Answer(s): A

Explanation:


Box 1: Yes
Move an Azure virtual network to another region by using Azure PowerShell. There are various scenarios for moving an existing Azure virtual network from one region to another. For example, you might want to create a virtual network with the same configuration for testing and availability as your existing virtual network. Or you might want to move a production virtual network to another region as part of your disaster recovery planning.

You can use an Azure Resource Manager template to complete the move of the virtual network to another region. You do this by exporting the virtual network to a template, modifying the parameters to match the destination region, and then deploying the template to the new region.

Move networking resources to new resource group or subscription. You can move virtual networks and other networking resources to a new resource group or Azure subscription. Azure Resource Mover helps you move Azure resources between Azure regions.

All Azure resources are created in an Azure region and subscription. A resource can only be created in a virtual network that exists in the same region and subscription as the resource.

Note: VNet1 is in East US. Vnet1 is in RG1. RG1 is in East US.
RG3 is in UK West.

Box 2: No
VNet1 is the only virtual network in East US. Vnet1 has one subnet Subnet1-1 with IP address range 10.1.1.0/24. This address range has only 256 unique IP addresses.

Box 3: No
RG2 already has a VNET named Vnet2.

Scope
All Azure resource types have a scope that defines the level of that resource and that the resource names must be unique. A resource must have a unique name within its scope.

For example, a virtual network has a resource group scope, which means that there can be only one network named vnet-prod-westus-001 in a given resource group. Other resource groups could have their own virtual network named vnet-prod-westus-001.


Reference:

https://learn.microsoft.com/en-us/azure/virtual-network/move-across-regions-vnet-powershell https://learn.microsoft.com/en-us/azure/cloud-adoption-framework/ready/azure-best-practices/resource-naming


View Related Case Study

SIMULATION


Username and password

Use the following login credentials as needed:

To enter your username, place your cursor in the Sign in box and click on the username below.

To enter your password, place your cursor in the Enter password box and click on the password below.

Azure Username: User-12345678@cloudslice.onmicrosoft.com
Azure Password: xxxxxxxxxx

If the Azure portal does not load successfully in the browser, press CTRL-K to reload the portal in a new browser tab.

The following information is for technical support purposes only:
Lab Instance: 12345678

You need to ensure that all hosts deployed to subnet3-2 connect to the internet by using the same static public IP address. The solution must minimize administrative effort when adding hosts to the subnet.

To complete this task, sign in to the Azure portal.

  1. See Explanation section for answer.

Answer(s): A

Explanation:

NAT gateway provides outbound internet connectivity for one or more subnets of a virtual network. Once NAT gateway is associated to a subnet, NAT provides source network address translation (SNAT) for that subnet. NAT gateway specifies which static IP addresses virtual machines use when creating outbound flows.

Plan:
Stage 1: Create a NAT gateway
Stage 2: Edit subnet subnet3-2 and link it to the NAT gateway

Stage 1: Create a NAT gateway

Step 1: Sign in to the Azure portal.

Step 2: In the search box at the top of the portal, enter NAT gateway. Select NAT gateways in the search results.

Step 3: Select + Create.

Step 4: In Create network address translation (NAT) gateway, enter or select this information in the Basics tab:

* NAT gateway name: Enter myNATgateway

Step 5: Select the Outbound IP tab, or select the Next: Outbound IP button at the bottom of the page.

Step 6: In the Outbound IP tab, enter or select the following information:
Public IP addresses - Select Create a new public IP address.
In Name, enter myPublicIP.
Select OK.

Step 7: Select the Review + create tab, or select the blue Review + create button at the bottom of the page.

Step 8: Select Create.

Stage 2: Edit subnet subnet3-2 and link it to the NAT gateway Change subnet settings

Step 1: Go to the Azure portal to view your virtual networks. Search for and select Virtual networks.

Step 2: Select the name of the virtual network containing the subnet you want to change.

Step 3: From Settings, select Subnets.

Step 4: In the list of subnets, select the subnet you want to change settings for. Here choose subnet3-2

connect.

Step 5: In the subnet page, change the NAT Gateway to myNATgateway (the one we created in Stage 1).

Step 6: Select Save.


Reference:

https://learn.microsoft.com/en-us/azure/virtual-network/nat-gateway/nat-gateway-resource https://learn.microsoft.com/en-us/azure/virtual-network/nat-gateway/quickstart-create-nat-gateway-portal


View Related Case Study

SIMULATION


Username and password

Use the following login credentials as needed:

To enter your username, place your cursor in the Sign in box and click on the username below.

To enter your password, place your cursor in the Enter password box and click on the password below.

Azure Username: User-12345678@cloudslice.onmicrosoft.com
Azure Password: xxxxxxxxxx

If the Azure portal does not load successfully in the browser, press CTRL-K to reload the portal in a new browser tab.

The following information is for technical support purposes only:
Lab Instance: 12345678

You need to ensure that subnet 4-3 can accommodate 507 hosts.

To complete this task, sign in to the Azure portal.

  1. See Explanation section for answer.

Answer(s): A

Explanation:

Change subnet settings

Step 1: Go to the Azure portal to view your virtual networks. Search for and select Virtual networks.

Step 2: Select the name of the virtual network containing the subnet you want to change.

Step 3: From Settings, select Subnets.

Step 4: In the list of subnets, select the subnet you want to change settings for. We select subnet 4-3.

Step 5: In the subnet page, change the Subnet address range setting:
For 507 hosts we need a 9-bit address range or larger, that is /23.

Change to address to /23. For example: 10.0.0.0/23 will work fine.

Note: For example, in a virtual network with address space 10.0.0.0/16, you might define a subnet address space of 10.0.0.0/22. The smallest range you can specify is /29, which provides eight IP addresses for the subnet. Azure reserves the first and last address in each subnet for protocol conformance. Three more addresses are reserved for Azure service usage. As a result, defining a subnet with a /29 address range results in three usable IP addresses in the subnet.

Step 6: Select Save.


Reference:

https://learn.microsoft.com/en-us/azure/virtual-network/virtual-network-manage-subnet


View Related Case Study

You are planning the IP addressing for the subnets in Azure virtual networks.

Which type of resource requires IP addresses in the subnets?

  1. Azure DDoS Protection for virtual networks
  2. virtual network peering
  3. internal load balancers
  4. service endpoints

Answer(s): C

Explanation:

During the creation of the load balancer, you'll configure:
Frontend IP address
Backend pool
Inbound load-balancing rules
When you create an internal load balancer, a virtual network is configured as the network for the load balancer.
A private IP address in the virtual network is configured as the frontend for the load balancer. The frontend IP address can be Static or Dynamic.
Incorrect:
* service endpoints
A service endpoint is created in a virtual subnet, but there is no IP address defined for the Service endpoint.

Service endpoints are a way for Azure DevOps to connect to external systems or services. They're a bundle of properties securely stored by Azure DevOps, which includes but isn't limited to the following properties:
Service name
Description
Server URL
Certificates or tokens
User names and passwords
* service endpoint policies
Service Endpoint Policy object, example.
"serviceEndpointPolicyDefinitions": [
{
"description": null,
"name": "MySEP-Definition",
"resourceGroup": "MySEPDeployment",
"service": "Microsoft.Storage",
"serviceResources": [
"/subscriptions/subscriptionID/resourceGroups/MySEPDeployment/providers/Microsoft.Storage/ storageAccounts/mystgacc"
],
"type": "Microsoft.Network/serviceEndpointPolicies/serviceEndpointPolicyDefinitions" }
]


Reference:

https://learn.microsoft.com/en-us/azure/load-balancer/quickstart-load-balancer-standard-internal-portal https://learn.microsoft.com/en-us/azure/virtual-network/virtual-network-service-endpoint-policies-overview


View Related Case Study

SIMULATION


Username and password

Use the following login credentials as needed:

To enter your username, place your cursor in the Sign in box and click on the username below.

To enter your password, place your cursor in the Enter password box and click on the password below.

Azure Username: User-12345678@cloudslice.onmicrosoft.com
Azure Password: xxxxxxxxxx

If the Azure portal does not load successfully in the browser, press CTRL-K to reload the portal in a new browser tab.

The following information is for technical support purposes only:
Lab Instance: 12345678

You need to ensure that virtual machines on VNET1 and VNET2 are included automatically in a DNS zone named contosoazure. The solution must ensure that the virtual machines on VNET1 and VNET2 can resolve the names of the virtual machines on either virtual network.

To complete this task, sign in to the Azure portal.

  1. See Explanation section for answer.

Answer(s): A

Explanation:

What is the auto registration feature in Azure DNS private zones? The Azure DNS private zones auto registration feature manages DNS records for virtual machines deployed in a virtual network.
When you link a virtual network with a private DNS zone with this setting enabled, a DNS record gets created for each virtual machine deployed in the virtual network.

For each virtual machine, an A record and a PTR record are created. DNS records for newly deployed virtual machines are also automatically created in the linked private DNS zone.
When a virtual machine gets deleted, any associated DNS records also get deleted from the private DNS zone.

Step 1: Locate the DNS zone contosoazure

Step 2: On the left pane, select Virtual network links.

Step 3: Select Add.


Step 4: Type myLink for the Link name.

Step 5: For Virtual network, select VNET1.

Step 6: Select the Enable auto registration check box.
To enable auto registration, select the checkbox for "Enable auto registration" when you create the virtual network link.

Step 7: Select OK.

Step 8: Repeat procedure for VNET2.


Reference:

https://learn.microsoft.com/en-us/azure/dns/private-dns-autoregistration https://learn.microsoft.com/en-us/azure/dns/private-dns-getstarted-portal#link-the-virtual-network


Viewing page 22 of 75
Viewing questions 106 - 110 out of 396 questions


Post your Comments and Discuss Microsoft AZ-700 exam prep with other Community members:

AI Tutor AI Tutor 👋 I’m here to help!